I have a thing for curtains. I love how curtains can change a room instantly. They can add color, drama, and coziness, and without them, the room just feels bare to me. In fact, one of my least favorite parts of moving is taking down my curtains because then the house feels so empty without them.
When we moved, I knew I wanted to try the trick I’ve read about online for creating custom curtains. I hate having to buy new curtains each time we move, which is about every three years. There’s never enough to that match or I have too many of one style but not enough rooms to use them in. It’s a constant shuffle, so I just end up buying new.
But that’s a lot of dough to throw at something you’re only going to use for a few years.
So when I read about the DIY IKEA hack for curtains that makes them look RICH and CUSTOM, I was all in.
Fortunately, we have an IKEA right here in Norfolk, so I was able to run over there after school drop off and pick up some of these RITVA white curtains in 98″ for only $29 for a pair. I have four windows in my living room, so for $120, I could do the entire room in new CUSTOM looking curtains.
Here’s also what I ordered:
These gold curtain rods from Walmart for only $15 a rod
Gold curtain rings from Amazon
IKEA Ritva Curtains
How to Create Custom Pinch Pleat Curtains on a Budget
I had read a few blog posts about how to make these IKEA curtains look custom, but when I’m in the zone, I never want to pull any of those posts up and reread them. Some may call it lazy… Some may call it being a creative… But it’s more that I’m a mom who has very little kid-free time, so I have to work fast. Ha!
These IKEA curtains are fabulous because they give you the option of using these drapery pins OR just inserting a curtain rod through the loops. I prefer to hang them on pins so I can get more of a pinch pleated look.

How High Should You Hang Curtain Rods?
While we’re talking about the curtain rods, let’s all review where our curtain rods are hung in our houses. As a general rule, you want to hang them as close to the ceiling as possible and between 6-8″ beyond your window frame on each side. If you have crown molding, hang it just below that – Don’t drill into your crown molding!
My husband created a little pattern for himself that was a piece of paper cut 7″ wide and 10″ high, which is where we wanted the rod to hang vertically. He then put that paper on the top edge of the window frame, and its corner was the exact spot to mark for the holes.
I can’t stress enough how much hanging your curtains high creates the illusion of a taller space. We had been in this house for a month without any curtains, and once my husband hung up the rods and we did a quick hang of these curtains, it made the room feel so much taller – even without the pinch pleating!
OK – Back to pinch pleating the curtains…
How to Pinch Pleat Curtains with Drapery Pins
I started by inserting one of the drapery pins into the tiny hooks at the top of the curtain panel and on the farthest edge. I inserted the next pin about 6″ from the last one.

I started with the drapery pin that’s the farthest to the right and on the edge of the curtain
Here’s a tip: I used my flat, relaxed palm as my 6″ spacing. No need for a ruler, use your hand as a unit of measurement. It won’t change, and we don’t need to be SUPER exact here.
Your hand’s size won’t change, so use that for measurement
Then, I added another pin about 1″ from that one. Continue that spacing the entire way across the curtain. For these RITVAs, I ended up using 16 drapery pins. Here’s a photo of the spacing.

As long as your hand is about 6″ wide between the drapery pins
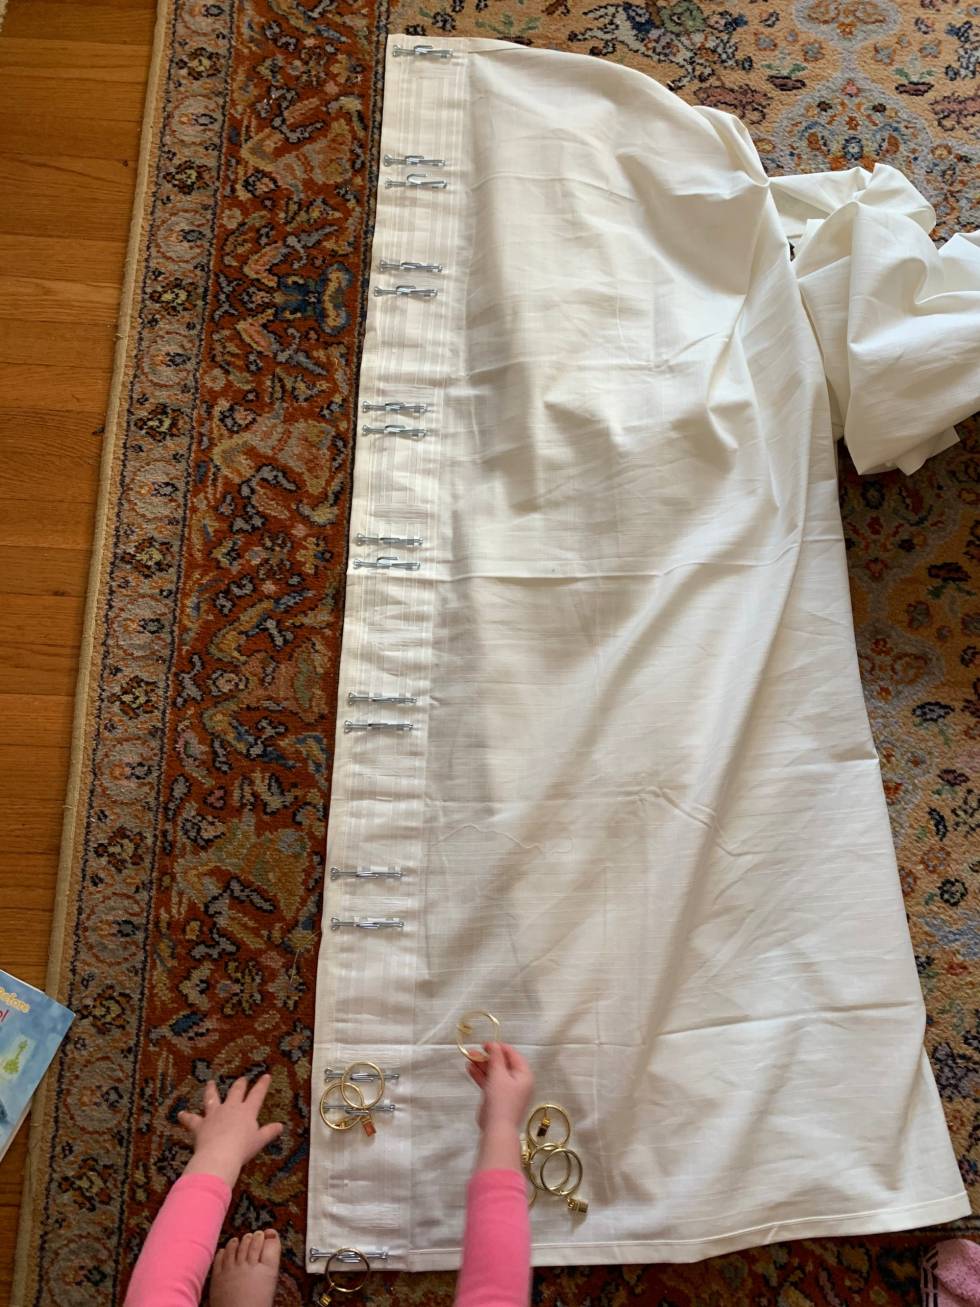
Here’s the entire panel with the pins inserted
Once you have all the pins inserted into your panel, it’s time to hang them!
I found it easiest to go ahead and hang my rings onto the rod by themself like this.
Then, I got on my step ladder and hung the curtains in a certain way to create the pinch pleat.
How to Create a Pinch Pleat In Your Curtains
To create the pleats, you’re going to hang two of the pins on the same hook. It may look like you would hang those two pins that are closest in the same ring, but actually, you are going to pinch the two that are farther apart to hang them onto the same hook. Pinch to make the PINCH pleat! See what I did there?

This is the first pin on the right pinched together with the next pin to the left. You can see how the third pin is right by this joined pair. You’ll take him and pair him with the next one that’s 6″ away.

Here’s a photo of two pinched pairs that make the pleats
If you used 16 pins like me, you’ll end up needing 8 rings for each panel, one for each pinched pair of pins.
I found it easiest (maybe because I’m right handed?) to gather the curtain on my right hand side and start by pinning the two on the right side of the curtain, working from right to left.
Here’s a great side-by-side of a pinch pleated curtain next to one that was just threaded on the rod.
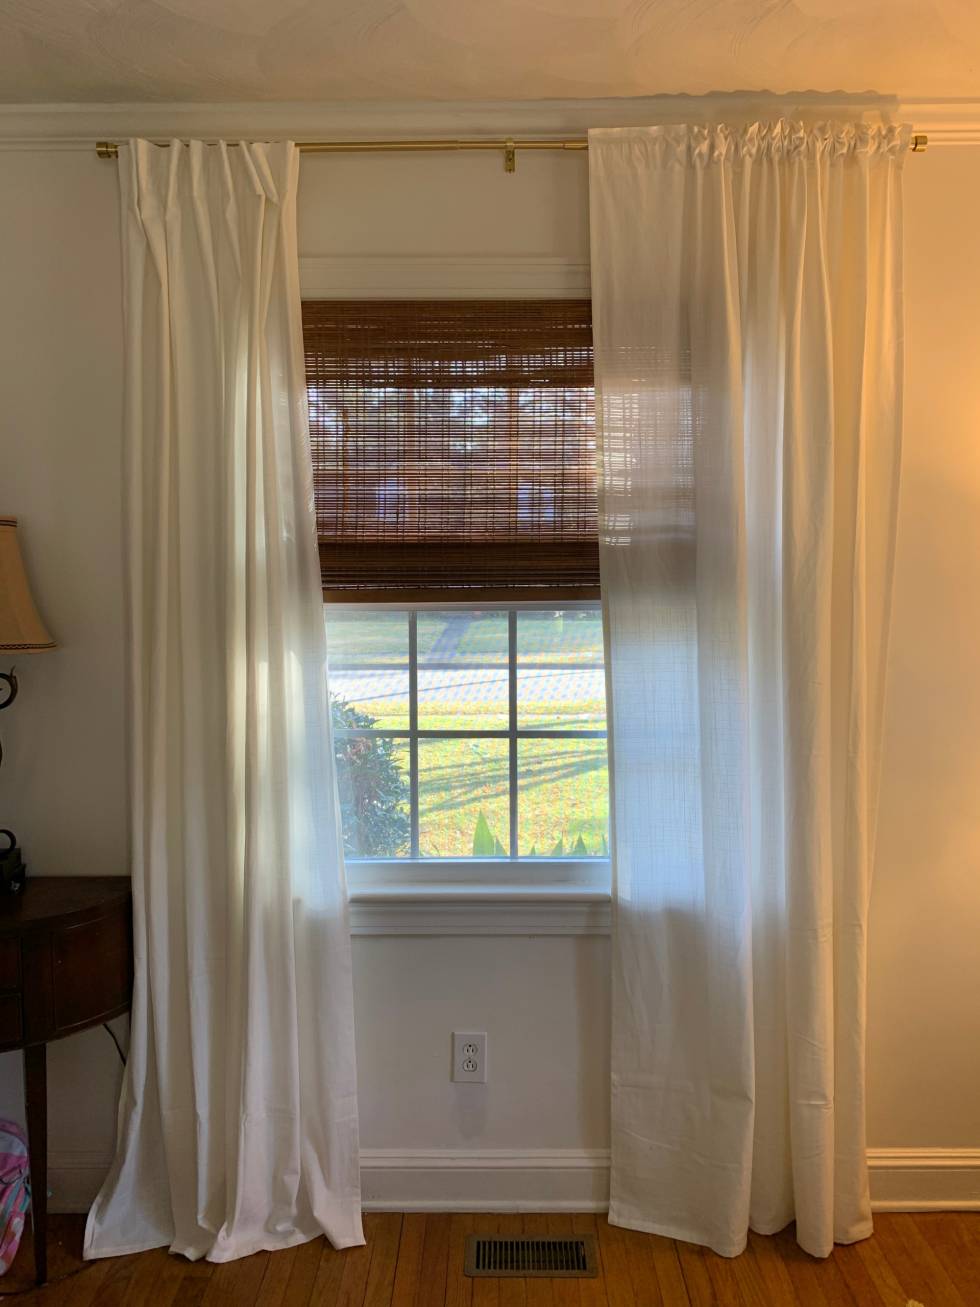
Don’t you love the difference?

Voila! Here are two pinch pleated curtains

How to Train Your Curtains
After you get your curtains hung, you’ll want to play with them a little to emphasize the pleating. I liked to pleat mine into an accordian fold and make sure the pleats go the whole way to the floor. I haven’t yet, but I plan to use some binder clips to hold the pleats in place. Yes, you need to TRAIN your drapes!
I’d also be interested in knowing if anyone has used starch at the top to get them to stick up. While these curtains are fairly thick (I’d say even somewhat light blocking?), they’re still more of a linen texture that’s flowy and not too sturdy.
Would love to know if you’ve also used these curtains and any other tips you could share! Or do you have questions about taking this project on? Please comment below!
Take It A Step Further – How to Add Trim Tape to Your Curtains
You’ll need:
I like to add my trim with my curtains already hung.
I like to place my trim so that the edge of the curtain and trim are flush.
I start by wrapping my trim over the top of the curtain by about 1.5″. I glue it down. This anchors the trim to the top back of the curtain and ensures that I don’t have any frayed edges at the top showing.
Continue glueing your trim along the edge of your curtain, pressing it into the curtain as you go.
I really like the Fabric Fuse glue. It’s super strong and dries quickly.
Continue glueing until you reach the bottom of your curtain.
I like to flip the trim up underneath my curtain and glue it down about 1.5″ up onto the back of my curtain. Similar to the top, this ensures I have a nice clean edge of trim ribbon at the bottom and not a frayed edge.
Cut the trim if you have any excess!
That’s it! It couldn’t be easier